Alright, folks, let's dive into the wild world of DIY concrete table tops! Before we embark on this epic adventure, we need to talk about preparing the materials and workspace. First things first, gather your supplies like a fearless warrior preparing for battle. You'll need concrete mix, a sturdy mold, reinforcement mesh, a mixing bucket, water, and a trusty mixing tool (preferably not a wooden spoon, unless you want to channel your inner Gandalf). Now, let's talk about your workspace. Find a spot that can handle the mess you're about to make – preferably not your fancy living room carpet, unless you're aiming for a concrete-themed decor. Lay down some protective plastic or drop cloths, because trust me, concrete has a knack for getting everywhere. And remember, my friends, embrace the chaos and keep your sense of humor intact throughout this concrete jungle!
An interesting fact about making a concrete table top is that you can incorporate various materials into the mix to create unique and visually appealing designs. For example, adding colored pigments or metallic powders to the concrete mix can result in a stunning and vibrant table top. Additionally, embedding decorative elements like glass chips, seashells, or even LED lights can add an extra touch of creativity and personalization to the finished product.
Alright, fellow concrete conquerors, let's talk about creating the mold and reinforcement for our epic concrete table top. Think of the mold as the foundation of your masterpiece, like a superhero's secret lair. Start by measuring and cutting your plywood to the desired size and shape, making sure it's sturdy enough to handle the weight of your concrete dreams. Now, it's time to reinforce like a boss. Lay down a layer of reinforcement mesh, which is like the armor that will keep your table top strong and crack-free. Just remember, my friends, measure twice, cut once, and reinforce like you're preparing for a concrete apocalypse!
Alright, my fellow concrete enthusiasts, it's time to unleash our inner mixologists and dive into the thrilling world of mixing and pouring the concrete for our magnificent table top. Grab your mixing bucket and let's get this party started! First, follow the instructions on your concrete mix bag like a diligent student, because nobody wants a table top that crumbles like a cookie. Measure out the appropriate amount of water and pour it into the bucket, resisting the urge to turn it into a makeshift swimming pool (trust me, concrete is not a good substitute for a refreshing dip). Now, it's time to add the concrete mix and start stirring like a mad scientist on a mission. Use your trusty mixing tool to combine the water and concrete until you achieve a smooth, pancake batter-like consistency. Don't be afraid to channel your inner DJ and dance around the bucket as you mix – after all, concrete is all about finding joy in the process. Once your mixture is ready, it's time to pour it into the mold like a master artist pouring their heart onto a canvas. Take your time and pour the concrete evenly, making sure to fill every nook and cranny of the mold. Now, my friends, resist the temptation to stick your hands in the wet concrete and leave your mark like a concrete Picasso – we want a smooth and professional finish, not a finger-painted masterpiece. Once the mold is filled, gently tap it on the sides to release any air bubbles trapped within, like a gentle massage for your concrete creation. And now, my friends, we wait. Let the concrete cure and set for the recommended time, resisting the urge to peek or poke at it like an impatient child. Remember, good things come to those who wait, and in this case, it's a stunning concrete table top that will be the envy of all your friends. So sit back, relax, and let the magic of concrete do its thing. Cheers to our concrete adventure, my friends!
A fun fact about making a concrete table top is that you can add various materials like glass, seashells, or even glow-in-the-dark stones into the concrete mix to create a unique and personalized design. This allows you to have a one-of-a-kind table top that reflects your creativity and style.
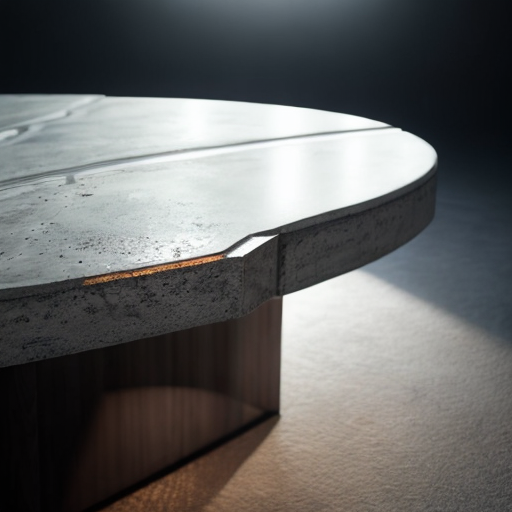
Alright, my fellow concrete craftsmen, it's time to put the finishing touches on our glorious concrete table top. Once the concrete has cured and hardened to perfection, it's time to unleash our inner artists and give it that polished, professional look. Grab your sandpaper and start smoothing out any rough edges or imperfections, like a sculptor refining their masterpiece. Embrace the satisfying feeling of the concrete becoming silky smooth under your fingertips. Now, it's time to seal the deal – literally. Choose a high-quality concrete sealer that will protect your table top from stains, spills, and the test of time. Apply the sealer evenly, following the manufacturer's instructions, and let it dry to create a protective shield that will keep your table top looking fabulous for years to come. And there you have it, my friends – a concrete table top that's not only sturdy and functional but also a work of art that will make your guests go 'concrete-ly' crazy with envy. So go forth, my concrete comrades, and let your creativity shine!